


In this article, I want to share my experience of bypassing root verification on my device. This article can be considered not only as a standalone piece, but also as a direct continuation of my work from the previous article .
 The screen that doesn't let me through
Since I had already put in a lot of effort to finally get this app running (you can read about the specific efforts in the previous article ), I decided not to give up and try to bypass the device rooting check.
A brief digression about how native code —that is, code native to the Android or iOS platform—runs in Flutter. For example, a Flutter developer faces the challenge of preventing the app from running on a rooted device. Jailbreaking is the equivalent of a rooted Android device. To check for rooting or jailbreaking, it's necessary to use native tools for both platforms. To do this, the developer writes a plugin that calls the appropriate native methods depending on the platform the app is running on.
Thus, I concluded that the existing .apk file contains at least two bytecode locations of interest to me. The first is the native portion of the app, which listens for commands from the Flutter portion of the app to call the corresponding native methods. And the second location is those native methods themselves, in this case the library for checking whether the device is rooted.
I decided to change the bytecode in the second place. To be honest, I initially worked with the first place, the plugin. This is because there's much less code there, and it was easier to get confused. It's just a method that calls another method—a couple of lines of code. But that would have made the article even more specific to the specific .apk file , and it wouldn't have been so abstract. So, we'll work directly with the library code.
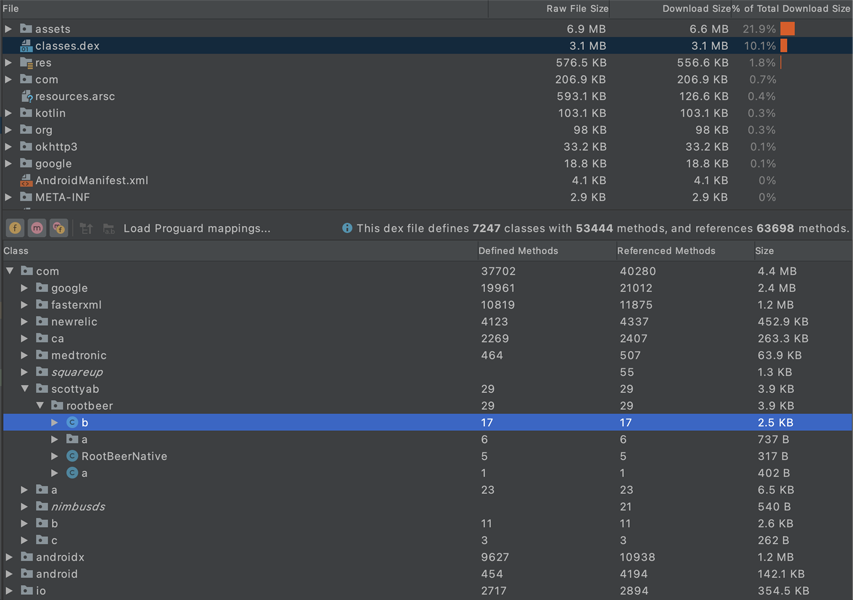
All compiled bytecode is stored in the classes.dex file . Let's select it and examine its contents. We're primarily interested in the application files, not the java or android.x files. Therefore, we select the first package in the Android project file structure; in my case, it's the com folder . Out of curiosity about the contents of each folder, I was triggered by the word rootbeer . A quick Google search revealed that it's a very popular library for checking whether a device is rooted.
After examining the documentation and the library's source code, it became clear how to use the library and where the key method isRooted() is located .
Even though most of the application's classes were obfuscated , I could still navigate and find the file I needed. I'm not saying obfuscation is useless. After all, if the file I needed was somewhere deep within the application, I likely wouldn't have found it.
Judging by the library source code, the file I need should be located next to the RootBeerNative class , and as we see here, there are two of them: a and b . By empirical means, I determined that it was file b . Right-click file b and select Show Bytecode from the drop-down menu .

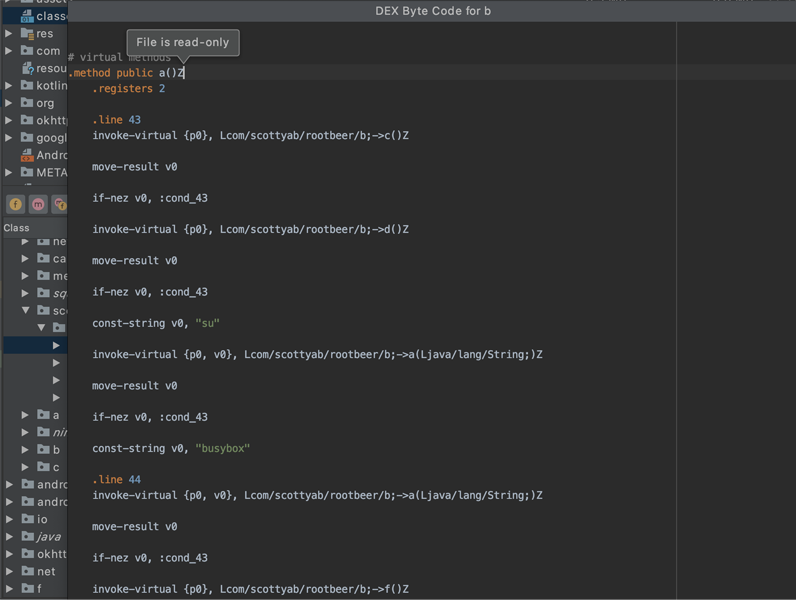
Unfortunately, all the method names are obfuscated. Looking back at the source file on GitHub , it becomes clear that the isRooted() method is on line 42. After digging through the bytecode file, I managed to find this method. Only now it's called a() and for some reason it starts running at line 43. I'll be editing this method, but not so quickly. Unfortunately, it's read-only .
apktool d appname.apk, which will decompile the specified .apk and apktool b directory_with_app, which will reassemble the .apk (the specified directory_with_app must contain the apktool.yml file ).
So, I perform decompilation using the command in the terminal:apktool d app.apk

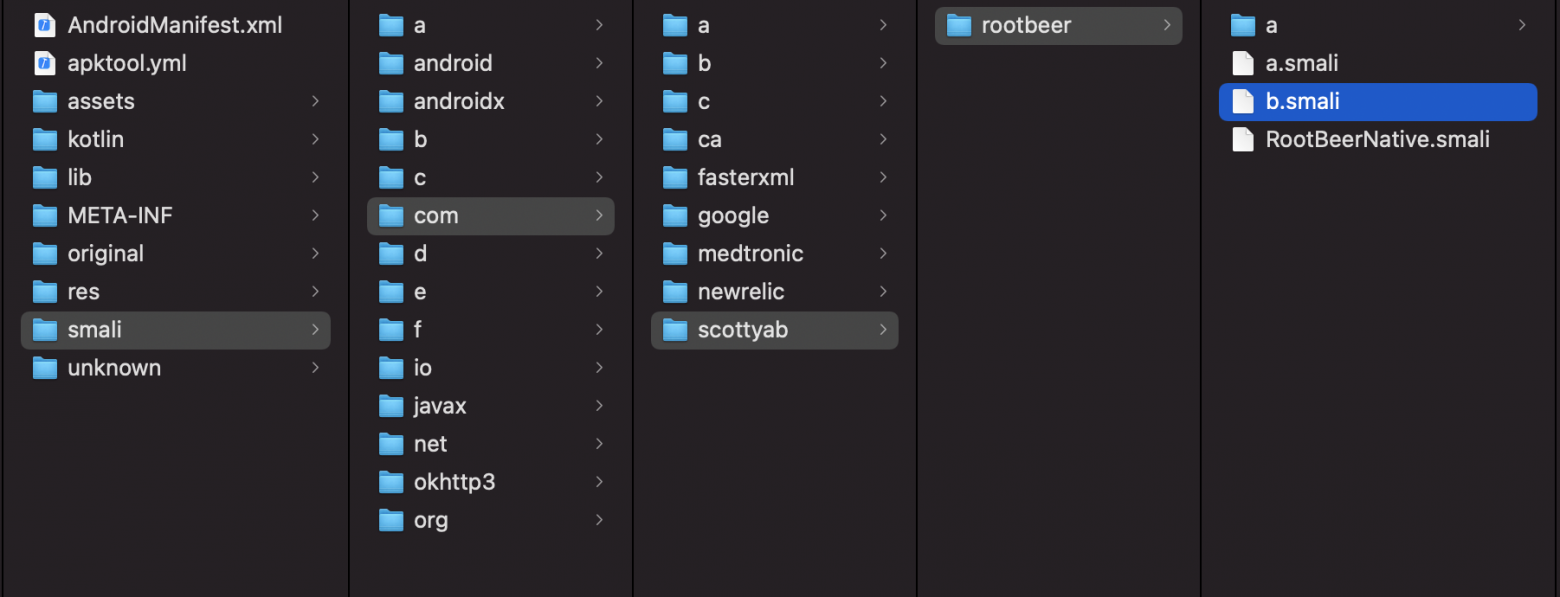
After executing the command, a folder containing the application files appears. We're interested in the smali folder . Smali is the language used to describe bytecode (here's a great article on smali basics ). This folder contains the classes.dex file . You can add a parameter to the command you just executed --skip-sources, or you'll see the classes.dex file -sinstead of the smali folder .
Next, in the smali folder we find the file of interest and already known to us b.smali :
Open it with any text editor and go to the place where the isRooted() method is located :
Contents of the b.smali file
We can compare it with the unique original:

They're very similar. So, we're interested in return , that is, the very end of the method. We see that the method returns a constant, v0 , whose value is determined based on the conditions met in the method. This isn't suitable for us. We always need to return false or, as it would be in smali , 0x0 . To do this, we'll add our own constant, v1 , with the value 0x0 . We'll do this right above return :
:goto_1
const/4 v1, 0x0
return v1
And of course, let's replace v0 with v1 in return . Let's go back to the very beginning of the method and change the value of .locals from 1 to 2 , because that's what it's supposed to be . Save the changes to the file and close the editor.
The APK failed to install.
Error: INSTALLPARSEFAILEDNOCERTIFICATES: Failed collecting certificates for /data/app/vmdl164530405.tmp/base.apk: Failed to collect certificates from /data/app/vmdl164530405.tmp/base.apk: Attempt to get length of null array
This is because after rebuilding, the application also needs to be re-signed. For this, we'll need any keystore file. Alternatively, we can create a new one using the command:
keytool -genkey -v -keystore my-release-key.keystore -alias alias_name -keyalg RSA -keysize 2048 -validity 10000
You can sign an application with a key using one of two tools: apksigner or jarsigner .
I chose jarsigner using the following command:
jarsigner -verbose -sigalg SHA1withRSA -digestalg SHA1 -keystore keystore app.apk cp_key
In this command, we specify the path to the keystore , the path to the .apk file we want to sign, and the key name (alias) from the specified keystore . Then, enter the keystore password , and the application is successfully signed.
But that's not all. Now, when trying to install the .apk file , we'll get a different error:
The APK failed to install.
Error: INSTALL_FAILED_INVALID_APK: Failed to extract native libraries, res=-2
This is because after signing the application, the .apk file needs to be optimized using the zipalign tool .
To perform optimization, you need to enter the following command:~/Library/Android/sdk/build-tools/30.0.3/zipalign -v -f -p 4 app.apk rdy.apk
30.0.3 – I chose the latest version at the time of writing. After the command completes, the output is the rdy.apk file , which can be successfully installed! Let's check if we were able to bypass the rooting check:

And yes, it is a success!
Disclaimer
Let me warn you right away that I like to write articles like this in great detail, not for the sake of length and verbosity, but to fully understand the problem and the solution. Please note that I work on macOS , so all terminal commands will be OS-specific.How did it come to this?
I was sent an .apk file for an app. There's a bug somewhere within the program that I need to reproduce. But I can't get into the app. My device doesn't pass the rooting check.
Since I had already put in a lot of effort to finally get this app running (you can read about the specific efforts in the previous article ), I decided not to give up and try to bypass the device rooting check.
What are we going to do?
The first thing that came to my mind was to try decompiling , tweaking the code here and there, and then reassembling it. My main concern about this approach was that I didn't have a native Android app , but a Flutter app . This meant I wouldn't be able to find the actual app code as bytecode in the .apk file . Or would I? And do I need the app code itself?A brief digression about how native code —that is, code native to the Android or iOS platform—runs in Flutter. For example, a Flutter developer faces the challenge of preventing the app from running on a rooted device. Jailbreaking is the equivalent of a rooted Android device. To check for rooting or jailbreaking, it's necessary to use native tools for both platforms. To do this, the developer writes a plugin that calls the appropriate native methods depending on the platform the app is running on.
Thus, I concluded that the existing .apk file contains at least two bytecode locations of interest to me. The first is the native portion of the app, which listens for commands from the Flutter portion of the app to call the corresponding native methods. And the second location is those native methods themselves, in this case the library for checking whether the device is rooted.
I decided to change the bytecode in the second place. To be honest, I initially worked with the first place, the plugin. This is because there's much less code there, and it was easier to get confused. It's just a method that calls another method—a couple of lines of code. But that would have made the article even more specific to the specific .apk file , and it wouldn't have been so abstract. So, we'll work directly with the library code.
Let's look at the .apk bytecode.
So, let's take a look at the .apk file's internals. You can use a tool provided by Android Studio for this . From the menu, select Build -> Analyze APK ... In the file selection window, find the .apk file you're interested in .
All compiled bytecode is stored in the classes.dex file . Let's select it and examine its contents. We're primarily interested in the application files, not the java or android.x files. Therefore, we select the first package in the Android project file structure; in my case, it's the com folder . Out of curiosity about the contents of each folder, I was triggered by the word rootbeer . A quick Google search revealed that it's a very popular library for checking whether a device is rooted.
After examining the documentation and the library's source code, it became clear how to use the library and where the key method isRooted() is located .
Even though most of the application's classes were obfuscated , I could still navigate and find the file I needed. I'm not saying obfuscation is useless. After all, if the file I needed was somewhere deep within the application, I likely wouldn't have found it.
Judging by the library source code, the file I need should be located next to the RootBeerNative class , and as we see here, there are two of them: a and b . By empirical means, I determined that it was file b . Right-click file b and select Show Bytecode from the drop-down menu .
Unfortunately, all the method names are obfuscated. Looking back at the source file on GitHub , it becomes clear that the isRooted() method is on line 42. After digging through the bytecode file, I managed to find this method. Only now it's called a() and for some reason it starts running at line 43. I'll be editing this method, but not so quickly. Unfortunately, it's read-only .
Editing the contents of classes.dex
To do this, you'll need to decompile the entire .apk file using the well-known apktool . It's quite simple to use. After installing it, you'll only need two commands:apktool d appname.apk, which will decompile the specified .apk and apktool b directory_with_app, which will reassemble the .apk (the specified directory_with_app must contain the apktool.yml file ).
So, I perform decompilation using the command in the terminal:apktool d app.apk
After executing the command, a folder containing the application files appears. We're interested in the smali folder . Smali is the language used to describe bytecode (here's a great article on smali basics ). This folder contains the classes.dex file . You can add a parameter to the command you just executed --skip-sources, or you'll see the classes.dex file -sinstead of the smali folder .
Next, in the smali folder we find the file of interest and already known to us b.smali :
Open it with any text editor and go to the place where the isRooted() method is located :
Contents of the b.smali file
We can compare it with the unique original:
They're very similar. So, we're interested in return , that is, the very end of the method. We see that the method returns a constant, v0 , whose value is determined based on the conditions met in the method. This isn't suitable for us. We always need to return false or, as it would be in smali , 0x0 . To do this, we'll add our own constant, v1 , with the value 0x0 . We'll do this right above return :
:goto_1
const/4 v1, 0x0
return v1
And of course, let's replace v0 with v1 in return . Let's go back to the very beginning of the method and change the value of .locals from 1 to 2 , because that's what it's supposed to be . Save the changes to the file and close the editor.
Reassembling the .apk
To do this, we'll use the command apktool b app, where app is the folder containing the application in which we edited the smali file. After the command completes, a dist directory will appear in the app folder. This is where our newly built .apk file is located . However, when attempting to install it, we'll receive the following error:The APK failed to install.
Error: INSTALLPARSEFAILEDNOCERTIFICATES: Failed collecting certificates for /data/app/vmdl164530405.tmp/base.apk: Failed to collect certificates from /data/app/vmdl164530405.tmp/base.apk: Attempt to get length of null array
This is because after rebuilding, the application also needs to be re-signed. For this, we'll need any keystore file. Alternatively, we can create a new one using the command:
keytool -genkey -v -keystore my-release-key.keystore -alias alias_name -keyalg RSA -keysize 2048 -validity 10000
You can sign an application with a key using one of two tools: apksigner or jarsigner .
I chose jarsigner using the following command:
jarsigner -verbose -sigalg SHA1withRSA -digestalg SHA1 -keystore keystore app.apk cp_key
In this command, we specify the path to the keystore , the path to the .apk file we want to sign, and the key name (alias) from the specified keystore . Then, enter the keystore password , and the application is successfully signed.
But that's not all. Now, when trying to install the .apk file , we'll get a different error:
The APK failed to install.
Error: INSTALL_FAILED_INVALID_APK: Failed to extract native libraries, res=-2
This is because after signing the application, the .apk file needs to be optimized using the zipalign tool .
To perform optimization, you need to enter the following command:~/Library/Android/sdk/build-tools/30.0.3/zipalign -v -f -p 4 app.apk rdy.apk
30.0.3 – I chose the latest version at the time of writing. After the command completes, the output is the rdy.apk file , which can be successfully installed! Let's check if we were able to bypass the rooting check:
And yes, it is a success!